
AngularJS Tutorial in a Hot Towel
Even though the time for Version 1.x from AngularJS is drawing to a close with the future release of Version 2, its use in combination with Style-Guide from John Papa is still very much worthwhile. In addition to the statement, that the support from AngularJS 1 is only then discontinued when the traffic on angular.io (Angular 2) exceeds that of angularjs.org (Angular 1), in other words when more developers take an interest in Angular 2, an official Upgrade-Path from Version 1.x to Version 2 exists. It will take a certain amount of time until all teething problems with Angular 2 have been rectified, and it is only then that the majority of developers will be able to trust AngularJS (V.1). A further factor is that the sheer number of existing Angular JS applications is reason enough to donate time to the topic and to learn about a really fantastic framework in the possibly last ever AngularJS tutorial.
AngularJS, generally just referred to as Angular, is probably one of the most popular JavaScript frameworks for web applications within the context of Single-Page-Applications (SPAs) on the client side. This is most likely due to the fact that the Angular was developed by Google, who also put its full weight behind its promotion. This could be construed as a point of criticism, Angular has nevertheless earned the approval of a large developer community. The reason for this is that Angular contains many established design patterns for software technology such as, for example, Model-View-ViewModel (MVVM), Two-Way Data Binding and Dependency Injection (DI) and, thanks to having Google behind it, it has the security of continuous further development.
The Angular design patterns and the components that have been mentioned will be described using example applications in this two-part article. Hidden behind the three different views is the connection of the web applications to a node-based REST server, which is in turn connected with a MongoDB (NoSQL database).

Within the main view is a table of superheroes who are defined by their first names and surnames, their alias and an ID. The illustrated superheroes are read directly out of the connected database, as soon as the view over the address bar or the navigation bar is opened. It is furthermore possible to add new superheroes to the database using two different form elements within the view, or to remove individual superheroes using their ID.
In the first section of the AngularJS Tutorial, the basic elements that constitute Angular are explained. These include modules, the bootstrapping from Angular, controllers, the data binding, templates and the individual directives. This should provide a fundamental understanding for continuation concepts such as services, data services, promises and event handling that will then be explained in the second part of the tutorial.
HotTowel as the starting point
(Please note: With the following repository, it is possible to jump directly to the section “Finally we come to frontend “, as long as a MongoDB has already been installed.)
In order to be able to begin directly with the programming of your own Angular web application without being required to spend long periods creating configurations and the writing of build scripts, one of the many Yeoman generators can be used. This tutorial is based on the HotTowel generator from John Papa. You can find further information in relation to this in the blog article “Von 0 auf 100 mit Yeoman (from zero to 60 with Yeoman)” by Christoph Wolfes.
HotTowel already contains a large number of log, debug and build tools and scripts which make life far easier when it comes to the development and delivery of a web application. Due to the fact, however, that this article primarily revolves around the subject of Angular, this is not gone into in detail. More exact information, as well as instructions on the installation of HotTowel generators can instead be viewed on the corresponding GitHub page.
Time for a tidy up
If the QuickStart section of the HotTowel generator has already taken place, a completed Angular web app already exists, that can be started on a local node server using $ gulp serve-dev or $ gulp serve-build. This application consists of two views, into which the widgets can be integrated. An administration view, which is empty except for a Todo widget, and a dashboard view, which accesses data on the integrated node servers. The node server behaves in this case like a REST server that returns mock data. The mock data are to be found in the file /src/server/data.js. These can be safely deleted because the future data are meant to come from an actual database.
The folders /src/client/app/admin/ and /src/client/app/dashboard/, including all files, can be deleted because they will then be replaced with two new folders in the course of the tutorial.
The following application structure will then exist:

REST Server with database connection
Before the actual programming of the frontend can begin, a number of configurations first need to be carried out on the backend. The first thing needed is a NoSQL database, MongoDB is a good choice in this case. This quickly installed. Via the terminal, the command $ npm install mongoose --save adds Mongoose to our project as standard (Please view the corresponding article in package.json). We require Mongoose in order to be able to easily access our database. Within the project we must now also change the two files /src/server/app.js and /src/server/routes.js and create the new file /src/server/utils/models/hero.js:
Complementing app.js with:


This means that the node server can be connected with the database, which can be accessed by REST-API. Via the API, individual heroes can be deleted, changed or new heroes added, while the display of all or individual heroes is possible (Please note: It is assumed that the database is running and obeys Port 27017. It is possible to make changes with respect to the database in the file app.js).
In order to exactly understand what has just happened in the steps carried out, it is definitely worthwhile having a look at this Article.
We finally come to frontend
This means that the configuration is finished and all preconditions have been fulfilled, which in turn means that the development of GUI can be begun with. Due to the fact that both views were deleted two sections ago, and only a basic structure is in place, new views need to be created. This is where Angular comes into play.
Two new views are to be created. A simple welcome view with a message and a second view, as described in the introduction, reacts and the frontend access to the REST-API is emphasised. The current module-independence-structure of the Frontend application is as follows:

What modules and the following Angular components are exactly will be explained in detail in the following sections parallel to the actual tutorial. But first a short explanation of the basic structure of the already existing application.
The core module contains services, providers and configurations which are shared across the entire application. These include, among other things, data services, angular-specific modules (labelled with an ng prefix), routers and black modules. The block modules are blocks of code, such as loggers, exceptions and routers, which can be reused. The widgets module contains templates and directives on using widgets within the application.
What are modules?
Modules can be viewed as being containers for the individual parts of the application, in other words for controllers, services, filters, directives etc. In the application provided for example purposes, the module appis defined in the file app.module.js. This module can be regarded as being the main module. It has dependencies with respect to all other modules of the application and is the starting point for the bootstrapping within the index.html.
The definition (Setter) of the module with its dependencies looks as follows:

The modules inside the square brackets are dependencies of the app and need to be loaded first. The command angular.module(‘app’,[]); creates the module app and can be understood as being the setter, while the angular.module(‘app’); serves as a getter for a creating module. Carrying out module configurations in separate files ensures transparency within the project structure. This happens via the corresponding getter function. Components such as controllers, directives, services etc. can also be registered on a module.
What is bootstrapping?
Bootstrapping is understood to be the initialisation process of Angular within a simple HTML page. Single Page Applications (SPAs for short) can be created with Angular. This means that a new HTML page is not loaded for each view. The DOM of a single page is changed dynamically instead in order to bring about changes to the view.
In order to bootstrap an Angular within an HTML page, usually the index.html, the following steps are necessary:
1. Integrating AngularJS using Script-Tag in HTML.
2. Integrating own JS files (modules, controllers etc.) using Script-Tag.
3. ng-app=”app” within an HTML tag is the starting point for the module app.
In the example application, it appears as follows:

If Angular is integrated on a page as script, after the DOMContentLoaded Event was fired, it automatically searches for the ngApp directive (Please note: More directives to follow: What is important in this context is that the ngApp refers to <html ng-app="app"> within the HTML page). The corresponding module is subsequently loaded and the Application Injector is created. Due to the fact that ngApp directive is treated as the root for the compilation, it is also only possible to integrate Angular into partial sections of the HTML page. In the case of Angular, compilation means the connecting of directives with the HTML page.
It is recommended to load scripts only at the end of the HTML page, so as not to unnecessarily increase the length of the time needed to display the page. A prerequisite in the example is that angular.js and app.module.js are located in the correct corresponding folder structure (Please note: HotTowel provides a build Script, which automates the integrating process).
What are directives?
Directives can be regarded as markers on a DOM element (attribute, element name, comments, CSS-class), which inform the HTML compiler from Angular , assign a certain behaviour to the DOM element or can even completely change this. Directives are, for example, ngApp, ngRepeat, ngBind etc.
Due to the fact that Angular transforms the element tags and attribute names during the compilation process in camel case, in the case of directives this usually refers to normal names. It is in this way that <html ng-app="app"> turns into ngApp, for example.
The entry point index.html
As already explained in the segment “What is Bootstrapping?” Our example application has a /src/client/index.html as entry point. In this case the HotTowel generator automatically takes care of the integration of necessary JavaScript-, CSS- and HTML files when they are located in our project’s /src/client/app folder ($ gulp inject) thanks to the pre-defined build scripts.
As can be seen in the bottom code section, our ng-app=”app” directive is responsible for the entire HTML page. ng-include=”’app/layout/shell.html’” integrates external HTML pages relative to the path of the current page, and ng-show=”showSplash” shows or hides its own block depending on the boolean value of the “showSplash”. This variable is globally defined in the file /src/client/app/layout/shell.controller.js. A Splash Screen is a place holder while an application is being loaded.

It is ultimately the case that the index.html, including all integrated pages of the basic structure of the example applications with navigation bar, Splash Screen and general layout, can be integrated into the own views.
The first own module
For the simple welcome view, a new module app.welcome is created in the file /src/client/app/welcome/welcome.module.js.

The module depends on app.core and app.widgets, both of which need to be loaded ahead of app.welcome, and as a result can access their services etc. such as the logger for example.
We can now register our first own controller on this module. But first a short explanation of the individual components of the Model-View-ViewModel-Design Pattern from Angular. These are controllers (ViewModel), scopes (data model) and templates (view).
What are controllers?
Controllers, as the name already makes clear, are for controlling data. Within the MVVM design pattern, the controller assumes the role of the ViewModel and has a bi-directional connection to view. They have their own scope (data model), which is generated when the controller is created. Using the injectable service $scope, controller variables can be connected to the view. If a controller is created with controllerAs syntax, then the controller is bound to a specific value within its scope. The injection of $scope into the controller is then no longer necessary. What is exactly meant with this syntax will be described in the section “Routing with AngularUI Router”.

What are templates?
Bei Angular sind Templates HTML-Seiten mit angularspezifischen Elementen und Attributen. Sie repräsentieren die dynamische View der Applikation und stehen über den Scope in direkter Verbindung zum Controller. Ein Template kann folgende Angular-Elemente enthalten:
> Directives: Attribut oder Element, das existierendes DOM-Element erweitert oder wiederverwendbares DOM-Element repräsentiert.
> Markup: Doppelt geschwungende Klammern {{}}, um Expressions an Elemente zu binden.
> Filter: Datenformatierung für die View.
> Form controls: Validierung von Benutzereingaben.
Das folgende Beispiel enthält eine Expression und zwei Directives: ngController, zur Bindung des Controllers an das Template, und ngRepeat, das das DOM-Element für jeden Eintrag innerhalb des Arrays $scope.names wiederholt, das oben im MVVMExampleController definiert wurde, wiederholt.
In the case of Angular, templates are HTML pages with angular-specific elements and attributes. They represent the dynamic view of the application and are in direct contact to the controller via the scope. A template can contain the following Angular elements:
> Directives: Attribute or element that either expands an existing DOM element or represents a re-usable DOM element.
> Markup: Doubled curled brackets {{}}, in order to bind expressions to elements.
> Filter: Data formating for the view.
> Form controls: Validation of the information entered by the user.
The following example contains an expression and two directives: ngController, for connecting the controller to the template, and ngRepeat, which repeats the DOM element for each entry within the array $scope.names, and repeats what was defined above in the MVVMExampleController.

What are scopes?
Scopes are the data model between controllers (ViewModel) and the templates. Each Angular application has exactly one Root Scope and any amount of Child Scopes. The Root Scope begins after the ngApp Directive and encompasses the entire application. Child Scopes are hierarchically structured and are created within the view by certain directives such as e.g. ngController or ngRepeat. Angular supports the Two-Way Data Binding, this means that changes to the scope have the same effect on the view and on the controller. Changes can be made, for example, per user entry via view or by programme in the controller, for example, as a reaction to events.
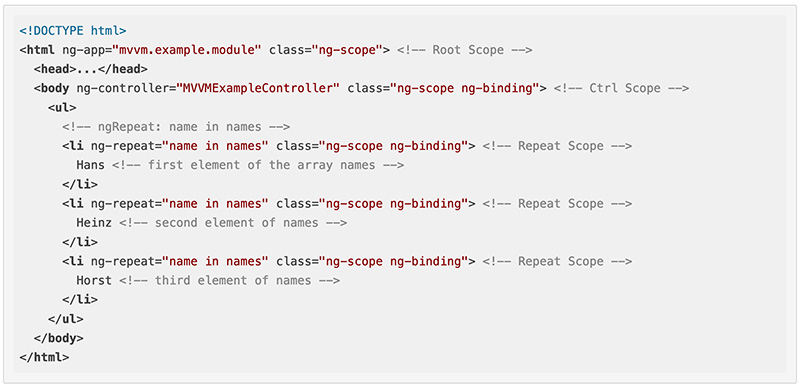
The following example shows the DOM that results after ngRepeat has been carried out. It consists of three different scope levels: A Root Scope and four Child Scopes, of which three scopes from ngRepeat are below the scope of ngController.
The first own controller
Back to the example application. Now that it is clear how the Data Binding of Angular functions, a controller is created in the file /src/client/app/welcome/welcome.controller.js in the following manner.

The controller is first registered on the module. The controller method contains a string, the name of the controller and an array consisting of services to be injected and a controller function as parameters.
The annotation /* @ngInject */ belongs to ng-annotate. The code for the production use is usually minified, which involves the variables being rewritten, which in turn leads to problems with the dependency injection. This problem can be avoided by providing the annotation and use of ng-annotate within a build script.
Due to controllerAs syntax, it is not necessary to inject $scope into the controller. This is instead connected to a variable (e.g. vm for ViewModel) within the controller, which results in better legibility.

Thanks to the controllerAs syntax, the upper code can be avoided and it can be written as follows instead:

The activate() function receives the start-up logic of a controller. This serves the purpose of transparency and leads to better testability of the controller.
The controller should contain as little logic as possible. The logic should instead be outsourced into services, so it can be distributed across many different controllers. This leads to a reduction of the dependencies and implementation details in the controllers, and the controller focusses on its own application area – data control.
What is dependency injection?
Dependency Injection, DI for short, is a software design pattern that takes care of the dissolution of dependencies between individual components. Angulars Injector Subsystem is in the position to create components, dissolve their dependencies and to make them available to other components.
During the bootstrapping process, an injector that takes care of the DI is automatically created for each Angular application.
The view to the controller
A model with accompanying controller is now within the example application, but there is still no view that can be manipulated by the controller. This will be the next to be created in the file /src/client/app/welcome/welcome.html. A simple widget with a title and a text message should be displayed.

The use of widgets is made available by the predefined Widget module from HotTowel. Furthermore, bootstrap is used for design purposes. The template, in other words the HTML page, which belongs to WelcomeController, consists of the following lines:

The classes container, row and col-md-6 belong to bootstrap, the classes with widget prefix to the widget module. The Data Binding between controller and view is located in the following line: <div ht-widget-header title="{{vm.title}}"></div>. The Expression contains the attribute vm.title, that is defined in the WelcomeController and which contains a simple Welcome string.

This example is very fundamental and displays the one-sided Data Binding from controller to view. In the later sections, the Two-Way Data Binding will be presented, in which case the data are changed via user input in the controller and vice versa.
What is still uncertain at this point in time is the question of how does Angular know that these HTML templates are to be integrated into the application, and which controllers are responsible for this. Ultimately it is not found within our entry point, the index.html.
Normally controllers are integrated into a HTML page by means of the ng-controller directive, which in turn lays down the scope of the respective controller. This looks as follows:

Angular applications are SPA and theoretically, all components (controller, directives etc.) from Angular can be integrated within one HTML page, which becomes very chaotic very fast however. In order to create modularities, and so summarise individual logistics components of the application, a different approach is desirable.
Due to the fact that the Angular applications are running in the web browser, which is normally used to access various pages via URL, it makes sense to also handle and structure sections of the Angular application just like statistic pages. The routing with AngularUI Router provides help in this case. Routing is comparable with the navigation between pages from statistics pages via the browser’s address bar.
Routing with the AngularUI router

The example application avails of the module ui.router (please see /src/client/app/core/core.module.js) for the routing. With the help of this module, the circumstances that occur when a specific URL is activated are defined.
The HotTowel generator provides the routing as standard and defines the provider routerHelper for this purpose. In order to be able to access this and to create a condition for the Welcome-View, the file /src/client/app/welcome/welcome.route.js is created:
The uiView directive in the file /src/client/app/layout/shell.html states at which position the routing circumstances are located (<div ui-view ...></div>). Depending on the active condition, at this point the corresponding condition template with accompanying Angular controller is displayed.
The file shell.html is integrated within the body tag of index.html by the ngInclude directive (<div ng-include="'app/layout/shell.html'"></div>). With ngInclude, external templates can be integrated into the current template.
The name of the newly established condition is welcome, and this becomes active when the URL /welcome is entered via a special link in the navigation bar (<a ui-sref="welcome"> please see: /src/client/app/layout/sidebar.html) or the browser’s address bar. Subsequently the template welcome.html is displayed for which the WelcomeController is responsible. Using controllerAs syntax, the controller can be addressed within the view with vm.
Conclusion part 1 and prospect part 2
After having completed the individual steps, the project now consists of the following elements:
> A REST-Server with NoSQL database, in which new heroes can be entered, changed, deleted or displayed via the XHR calls.
> The graphic basic structure for a web application with navigation bar.
> Routing between individual views within the application.
> A module for a Welcome-View.
> A Controller for a Welcome-View.
> A route condition for a Welcome-View.
The corresponding status of the application is located within the following repositories.


Comments
No Comments